![]()
![]()
![]()
|
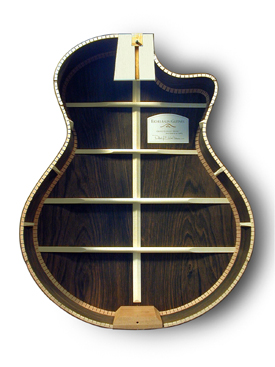
Design Concepts An individual builder has much greater freedom to experiment with designs than a factory might. Factories must concentrate on production methods and achieving consistent results from a huge range of type and quality of materials. Additionally, most factory guitars are also overbuilt in the interest of minimizing warranty claims. In fact, I believe most guitars are overbuilt to some degree....the trick is finding the right balance between durability and sound production. You really can have both. So although I use a traditional X-brace pattern on my soundboards I can brace them fairly lightly with no loss of durability mainly due to three key elements that strengthen the upper bout area: 1.) The Bolt-on Neck Joint, 2.) Adding a "paddle" to support the fingerboard, and 3.) Supporting the soundhole area under the rosette. These three elements result in gains in volume and sustain as well as more stable necks and action height. In more detail...
The Bolt-on Neck Joint
Fingerboard Paddle
Soundhole Support
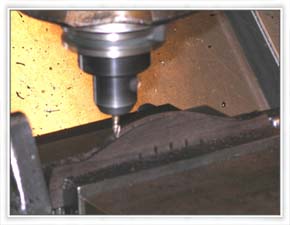
Pinless Bridge The new Pin-less bridge is now available as a "standard" feature if requested. Designed with CAD CAM technology, the new bridge is machined on a Fadal CNC machine for accuracy.
|
Shop Tooling and Jigs I probably employ as many jigs and fixtures as any independent builder out there today, maybe more. But no matter how many jigs you have guitars are still incredibly labor-intensive. The use of Jigs and fixtures simply allows for more accurate and consistent parts construction and more accurate body and neck geometry. Tradition has an important place in guitarmaking, but if I find a better way to do something, or a material or technology that makes a better instrument then I'll certainly use it if the result is a better guitar.
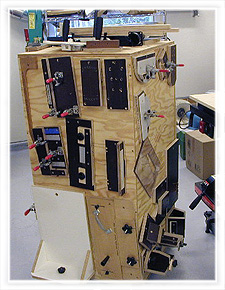
One of several jig "carts", and a Vacuum Gluing Press made here in the shop.
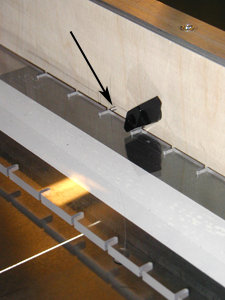
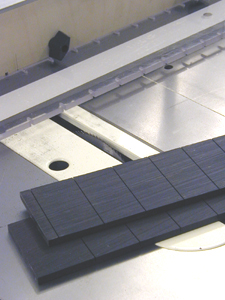
Slotting ebony fingerboards with a custom ground tablesaw blade. Fingerboard blanks are doublestick taped to an acrylic template with fret intervals indexed by a small pin (shown arrowed) in the purpose-built crosscut fence. The job is quick and extremely accurate...
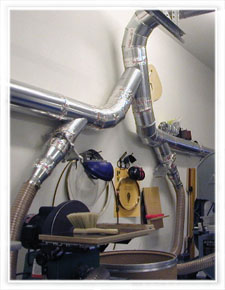
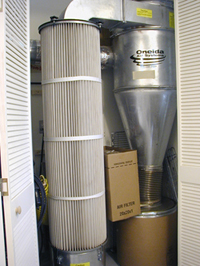
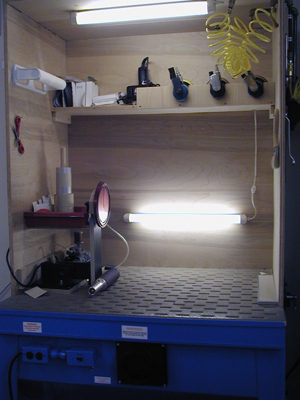
Dust Collection Dust collection in dedicated machine room is handled by a two-fold system. Smaller operations such as neck and body sanding are performed within a custom designed downdraft cabinet safe from harmful wood and finish dust. Bodies are safely cradled in a vacuum holding fixture that can be rotated for complete access to the guitar's rims. Orbital air sanders make quick, safe, and accurate work of leveling wood and bindings. Larger shaping operations and rough wood milling is done on traditional woodworking machines, all of which are connected to a central Cyclone type system.
Downdraft Sanding Station |
 Instrument
design is a constant challenge of pushing the envelope to produce
a more efficient guitar. I believe that while actual body shapes
and designs are somewhat important the accuracy and quality of
the construction is perhaps even more critical. So with that in
mind I'll offer a little insight into some of my designs, construction
techniques and various shop jigs & tooling.
Instrument
design is a constant challenge of pushing the envelope to produce
a more efficient guitar. I believe that while actual body shapes
and designs are somewhat important the accuracy and quality of
the construction is perhaps even more critical. So with that in
mind I'll offer a little insight into some of my designs, construction
techniques and various shop jigs & tooling. 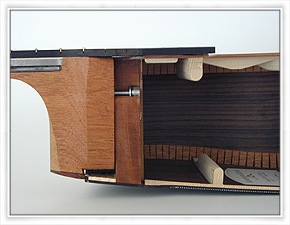 Traditional
dovetail neck joints are a perfectly adequate way to attach a
neck. However, I find that employing a full 3/4" slip-fit
mortise and tenon joint offers significant advantages. First,
the bolt-on design enhances stability and vibration transference
thru the use two mechanical fasteners that pull the heel snugly
into the neckblock and against the guitar sides. Second, this
method improves the accuracy of manufacture. Neck angles can be
precisely set (or re-set) without disturbing the strength of the
joint since no glue surfaces are affected by changes. Third, the
neck is easily removed by loosening the fasteners and lifting
the fingerboard from the top in the traditional way. This can
be accomplished in less than fifteen minutes with no worry of
damage from "steaming" the joint apart.
Traditional
dovetail neck joints are a perfectly adequate way to attach a
neck. However, I find that employing a full 3/4" slip-fit
mortise and tenon joint offers significant advantages. First,
the bolt-on design enhances stability and vibration transference
thru the use two mechanical fasteners that pull the heel snugly
into the neckblock and against the guitar sides. Second, this
method improves the accuracy of manufacture. Neck angles can be
precisely set (or re-set) without disturbing the strength of the
joint since no glue surfaces are affected by changes. Third, the
neck is easily removed by loosening the fasteners and lifting
the fingerboard from the top in the traditional way. This can
be accomplished in less than fifteen minutes with no worry of
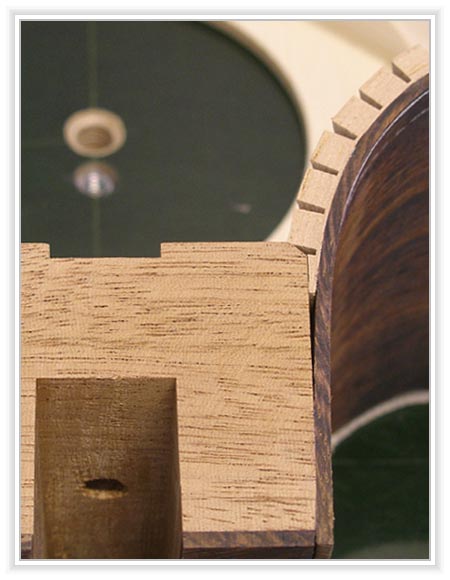
damage from "steaming" the joint apart. 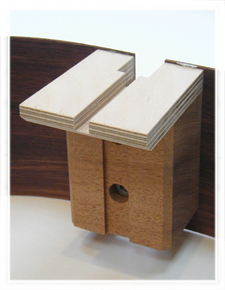 Shown
here is the neckblock with a birch ply paddle. The ply material
is used because of its inherent strength to weight ratio. It is
stronger and more stable than either mahogany or spruce, both
of which I have tested. The paddle provides complete support for
the fingerboard area and will ultimately provide a platform for
small bolts which replace the function of glue in holding the
fingerboard snug onto the soundboard. Also visible on the neckblock
is one of the countersunk bolt holes used for neck attachment.
As a final touch a matching mahogany filler strip is fitted into
the channel to hide the bolt heads.
Shown
here is the neckblock with a birch ply paddle. The ply material
is used because of its inherent strength to weight ratio. It is
stronger and more stable than either mahogany or spruce, both
of which I have tested. The paddle provides complete support for
the fingerboard area and will ultimately provide a platform for
small bolts which replace the function of glue in holding the
fingerboard snug onto the soundboard. Also visible on the neckblock
is one of the countersunk bolt holes used for neck attachment.
As a final touch a matching mahogany filler strip is fitted into
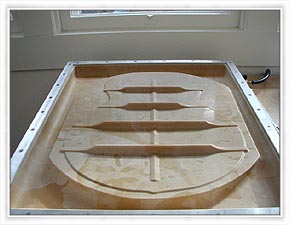
the channel to hide the bolt heads. 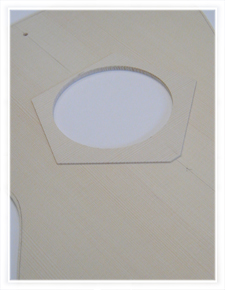 A
cross-grain patch of matching spruce is used to support the underside
of the rosette area and prevent distortion of this weakened area.
Not shown in this picture are the additional two braces added
on either side of the patch or the X-brace and upper transverse
braces. Classical makers use a similar support patch as a matter
of tradition.
A
cross-grain patch of matching spruce is used to support the underside
of the rosette area and prevent distortion of this weakened area.
Not shown in this picture are the additional two braces added
on either side of the patch or the X-brace and upper transverse
braces. Classical makers use a similar support patch as a matter
of tradition. 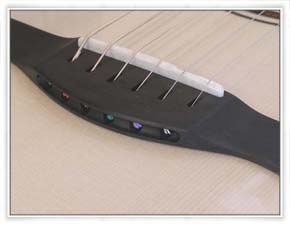
Details
Sometimes the details you can't see are the most valuable, or perhaps just the most interesting. Here are a few examples.
In this view you can see the care with which I tuck the kerfed linings into the neckblock. Not only does this "lock" everything together more solidly, it also provides a sound bed for the body's binding to ultimately lay in.
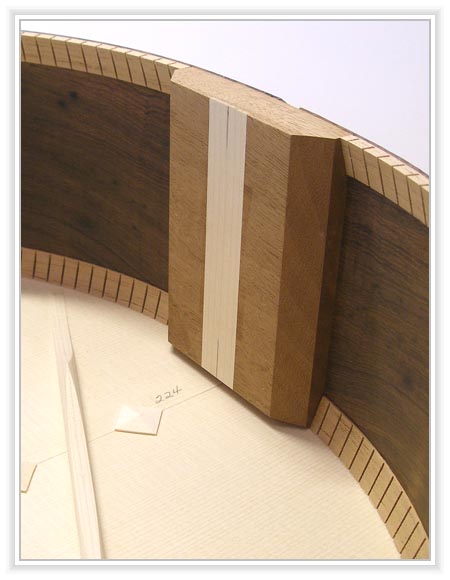
Here I have improved on an idea I got from vintage Martins to prevent the tailblock from splitting. While many builders today simply use birch ply for this part I think a more elegent solution is to inlay a strip of cross-grain maple. It also serves as a solid platform to install an endpin jack.